Showing posts with label Uguisu reflects on Ume. Show all posts

May 7, 2010

Uguisu Reflects on Ume -- Finished!


Completed, finished, pasted, and done.  Thank you all for your wonderful comments and support.  I have a tremendous amount of gratitude to the Stitchin Fingers Ning group for inspiring me to take a step in designing my first Japanese Embroidery styled piece.  I am planning on posting the design process behind URU on Monday/Tuesday.

Floating petals -- in the end I took one petal out and added two in.  A net gain of 1.  My local stitching support group was huge help in calming my concerns that the piece was beginning to look like it had chicken pox and was able to preserve many of my finger nails.  THANK you!!


Christa Lilystitch
 www.lilystitch.blogspot.com and www.lilystitch.com

May 3, 2010

BaRK (URU: Update)

Lot's going on here at the Lily patch.....  work continues on the kitchen of the Lily patch, a 55th birthday weekend, trying out screen printing methods for putting designs on fabric, and lastly, the Plum trunk was put in over the weekend.

We stayed up late last night to finish work on the Ume trunk.  I can't believe how much adding this feature has changed the whole piece.

Details on how I worked the trunk - step by step:  Used my handy blue pencil and drew in various cracks and crevices.  Twisted up a whole bunch of 2:1 medium twist.  Used a ton of colors and none of the twisted threads were one color - they were all mixed.  Here's a shot of the spools although I think there were 3 next to my awl when this was taken....
Chose to pretwist as many threads as possible so that I could just stitch putting in the shading where my eye chose instead of stitch then twist, stitch then twist, etc.  At first I laid in the cracks and crevices with a darker shade including some grey.  Due to placement of the tree I actually sitting at the top of picture below and working darkest to lightest and bottom to top.
I filled in the bottom of the trunk first.  I used a packed outline stitch as my technique of choice.  Mentally I divided the trunk into three parts of dark/medium/light stitching.  The bottom is the darkest and worked first:
Middle was medium and the top worked lightest.  My focus was to really concentrate on the shading as the there is so much shading on Uguisu and the Ume blossoms.

As you can see by the pictures, had lots of needles going at anyone time.  URU looked awfully hairy but it was great to be able to pick up and work a section in one color, park it, work another.

I think I'm going to add the use of thicker and thinner twisted threads for future trees/bark.  The cracks should probably have a thicker twist which will replicate a bumpy appearance.  The flat parts a thinner twist which will make it look finer.  I think what I've stitched works well on URU though.

Here he is this morning:

Almost finished:  Need to put in a couple more floating petals and then the stamens.  Ah, the stamens unless you think the Ume do not need them...

Hope you have a great stitching week!

Christa, Lilystitch
 www.lilystitch.blogspot.com and www.lilystitch.com

Apr 29, 2010

BaRK

Yes, bArK..... or tree bark.

You see, URU has this wonderful Plum trunk on the left hand side of the design that I've yet to stitch.  I've left it for almost last because I really love stitching trees.

This past weekend was two of my big brother's first big bike race that was mostly off-road near the White Water Center in Tennessee and went through the Cohutta Mountain Range.  Here's two quick pictures of the beginning of the race (proud sister of one brother that road 100 miles, the other 65 miles, through the worst weather conditions imaginable), Biggest brother is in red/black/white:

So a couple of my siblings.... Oh! I should stop here to explain that I am one of seven - four boys and three girls, I'm the oldest girl.  ... a couple of my siblings and I drove a really convoluted way up through the Cohutta mountain range to the halfway or 50 mile break point to cheer on the riders.  I've been hiking up there a couple of times but had forgotten how beautiful this area is.  Here is a picture of what Hermit, a couple of sibs and I found:


Isn't it beautiful?  About 55 degrees with bad weather moving in but this forest was almost surreal.  My little sister, Kermit (so called 'cause of the green jacket) and I had the best time wandering in this area:

Little sis is a forestry grad and we're both the daughters of naturalists so this really should not come as any real big surprise.  Every breath and view I took in brought images of how I could translate what lay before me onto fabric....

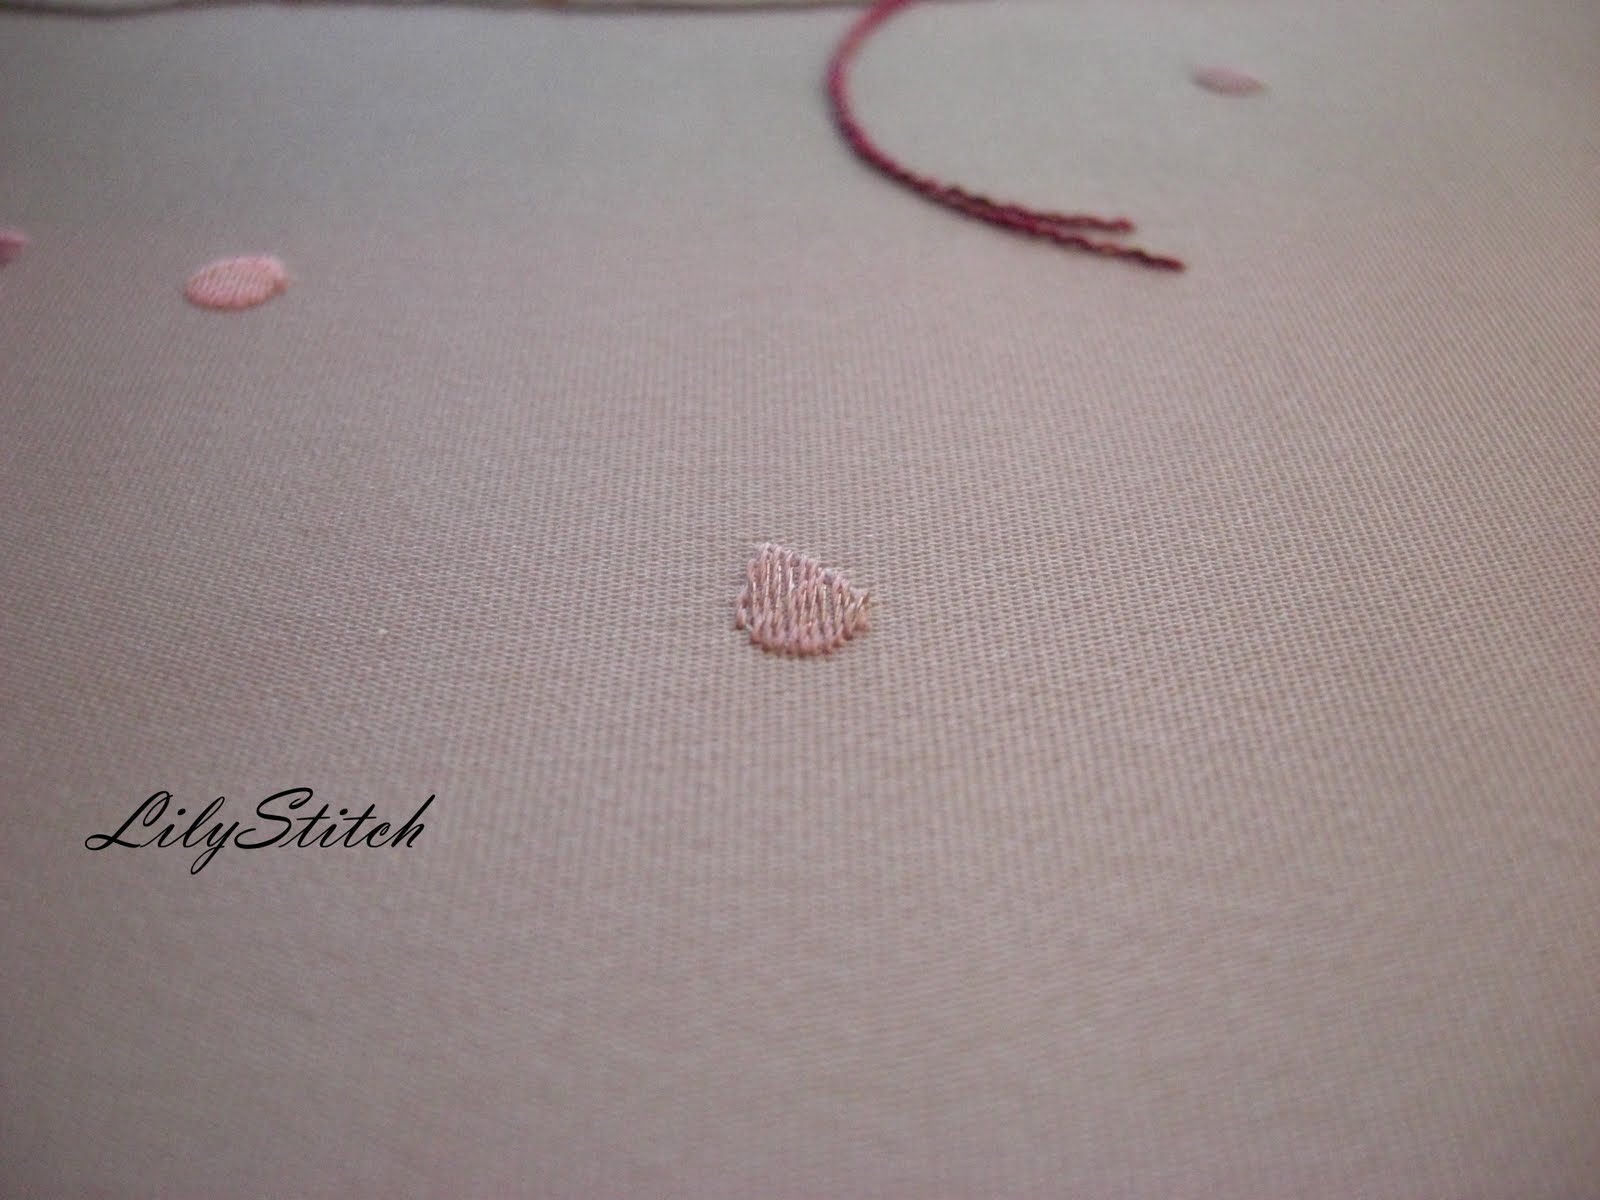
Naturally, my mind wandered to that Plum tree trunk and how I was going to go about it:


Little Kermit pointed out this wonderful Tulip Popular tree that was standing proud.  Actually, she said it wasn't that amazing of a specimen but I just loved how cragelly it is (is that a word?)


Most of what I love about it is was the wonderful bark.  This tree is the kind that you can lay your hand on and know it will see you through any kind of storm: weather or personal.  It had gorgeous bark and WONDERFUL moss:


In URU, I will not get so rustic but I do want to give the bark a bit of life and definitely show shading.  The Tulip Poplar will be an inspiration source for creating an almost realistic tree feel.  So home I came and was directly inspired to begin on the Plum trunk:


Next post I'll get more onto shading, creation of the trunk, better pictures, and notes on how to improve on future stitching trees endeavors.  Stay tuned!

Last notes before my tired eyes must close for the night.  To the left is another picture of this ethereal place.  Below this clump of trees we found a huge patch of Mayapples that grow naturally in the Cohutta Mountains.  They have a beautiful white flower that had not yet bloomed when we were there.  Another day or two of sunny, warm weather to produce their beautiful blossoms.  We also found tons of snails, strawberries, and other assorted wild flowers in their glory across from Bubba's cabin.

The deer had recently been through, rubbing their fur and doing what deer do in the spring just over this ridge.  I look forward to returning to this area in a few short weeks.

Christa Lilystitch
 www.lilystitch.blogspot.com and www.lilystitch.com

Apr 23, 2010

Petals in the Breeze


Quick update before I take off for my two big brother's weekend bike race (Cohutta 100) and the Blue Ridge Craft Festival.

As we say here in the south, "It came a Cloud" for Mr. Hugo this weekend.  Ume petals were stitched into the breeze.  A few just didn't cut it.  I was highly influenced by Shizuka Kusana's picture in "The Fine Art of Kimono Embroidery" (see below).  Pages 34-35 has this wonderful picture of literally a Petal storm.  It spoke to me so, although I didn't put in a gazillion petals, I did do more than I originally intended.  Please let me know if you think it's too much....  (nail biting moment).


The petals that I've added are done in Fuzzy Effect: Diagonally Held Valley Lines so that they will not be so prominent and let the bird and fan grab the eye.  I chose to do two of the lighter pink tones.  1 into 1 twist held down with a single #1 Dark Metallic Beige to give it a little subtle sparkle.


Kizuka Kusano "The Fine Art of Kimono Embroidery" -- this is a very inspiration book that I highly recommend for anyone who enjoys Japanese Embroidery.  It is not an instruction book but it is a wonderful eye candy for those who want inspiration.

Christa of Lilystitch 
www.lilystitch.blogspot.com and www.lilystitch.com

Apr 19, 2010

Monday Update #1: Uguisu Reflects on Ume


There has not been much time for stitching in the last few weeks but I have been able to carve a little bit to dedicate to URU as well as the Goldwork Glove Class (update to follow this evening).

Above is the a photo taken just this morning which shows the full piece including the newly completed cording.  I've debated and debated on weather or not to extend these cords but in the end chosen to leave them shorter for a breezy look which will draw the eye across the fabric.  I do intend to add a few, not many but a few, petals that will also add to the motion of the design.  Thank goodness for some great online tutorials and books on composition.  This challenge piece has taught me many, many things but perhaps one of the most lasting will be in constructing interesting composition.  I'm not sure I have it absolutely right but I feel good about it at this point.


My other accomplishment this weekend was to give Mr. Hugo some toes.  I'm a little disappointed that they do not stand out better and was going to change the color so they would pop but them my sweet husband walked into the room while I was debating and pointed out that birds are intended to blend in with their surroundings. Changing the legs and toes would actually not be consistent with nature (and the inspiration photo).  So I was persuaded that they will stay as is.  Here's a close up:


Onto the bark on the tree and a few more petals in the days ahead.  My brother is participating in the Cohutta 10 bike race this weekend which I'll be cheering him on plus there is a GREAT crafts festival in Blue Ridge that I'm destined to see my "wood" man (hoping to get more Koma).  So... I'm not sure that there will be an update after Thursday nor much stitching to report.  I will post an update to the Goldwork Glove class I've been participating tonight (I've finished the silk-work!).

Have a great week and enjoy the stitching!

Christa
Lilystitch
www.lilystitch.blogspot.com and www.lilystitch.com

Apr 11, 2010

Uguisu Update


I'm very excited to announce that I've finished working all the Ume blossom long and short stitching.  Up next on the Ume are the stamens plus a few petals that are floating in the breeze.  In my part of the world (Birmingham, AL, USA) all of the cherry and plum blossoms finished blooming about a week ago but the memory of the how this spring felt is still fresh.


I've begun working in the the tree branch and trunk.  This is a ton of fun as I'm playing with lots of shading using a two into one soft twist .  Branch is finished, trunk to come next. Here is a before and after on the pictures.

Branch under construction
Branch completed - picture is small so double click so you can see a larger version.
Did you notice Mr Hugo (Ume) has legs now?  I've yet to decide if I want to work in some toes but we'll see.  
Toes or No?
Christa
Lilystitch
www.lilystitch.blogspot.com and www.lilystitch.com

Mar 26, 2010

URU Update


Work on Uguisu reflects on Ume continues... but slowly.  The last three Ume are in progress and soon to be completed.  Then I'll add the legs of Uguisu so that I can put in the branch.  Lastly, I'll add some floating petals to help draw the eye across the design.  Later, I'll decide weather or not to just let the cord gradually end or if a muted tassel is in order....  Will blog and hopefully get your thoughts on that soon.

So what have I been up to?  Well..... have you checked out my blog landing page lately?  If you are reading this through GoogleReader, Networked Blogs, or some sort of RSS feed you might want to stop by and let me know how you like the new layout: www.lilystitch.blogspot.com. Better background picture coming soon...

Also, I've been doing a pretty big kitchen remodel.  By "I", I mean "me" - no outside contract help here.  Walls and ceiling painted, ugly tile off of backsplash.  Next - new tile, paint the counters and cabinets, then onto the floor.  Here are some pictures so that you can get a feel for why I've only been able to sneak some stitching in here and there.

Have a great weekend (I'll be Huck Fin'n)!

Christa
Lilystitch
www.lilystitch.blogspot.com and www.lilystitch.com

Mar 22, 2010

WIP Updates: URU, Glove, Twisted, and Petite Fleur

Holy wow!  Spring has brought lots of personal and professional changes.  Won't bore you with the details but I do want to post some updates on the current work in progress rotation that I am working on.  First up is "Uguisu reflects on Ume".  Mr. Uguisu is complete, well almost... need to stitch in the legs but his body has emerged.  I'm concentrating on the last of the Ume for the time being as it has become almost mindless to stitch in the long and short stitches.  I'll get the legs in next because they have to be done before I can put in the limb upon which he is perched.    Three more ume to go plus some petals swirling in the breeze.


Petite Fleur is almost complete, missing just a few beads plus the finishing.  I'm going to make her into a hanging ornament so that it may displayed year round.   This is also going to be a class piece for folks who want to experience working on silk gauze.  Deadline looms with an early April local ANG class.

Twisted - My version of "Twister" is getting a sliver here and sliver there put in.  Right now the golds:

Finally, Glove.  This is my go to piece when I'm tired after a day of work.  I'm loving the Soie silk that we're working these in.  I am finding the linen a bit of a challenge to get my stitches in where exactly where I want them to be.  Perhaps this is because I'm tired when working or it is a looser ground fabric than I'm used to or it is just a looser linen...  There has been some discussion on using a backing fabric but our instructor has written us to say that the linen is strong enough to support the stitching.  Anyway, this picture is a week old so more has been worked.  Updated pictures to come.  Can't wait for the Goldwork to begin!

Have a great week!

Christa
Lilystitch
www.lilystitch.blogspot.com and www.lilystitch.com

Mar 1, 2010

Goldwork on Fan - cont.

The Goldwork is finished on the fan and I do have some notes that I want to share with everyone but they will have to wait for a later post.

This afternoon I share with you some pictures of the Goldwok on the fan.  I did choose to continue the no 4 gold on the spokes and outline.  Enjoy!


Christa
Lilystitch
www.lilystitch.blogspot.com and www.lilystitch.com

Feb 22, 2010

Goldwork on Fan (Japanese)

Ah, how it sparkles, how it dazzles!  I DO love Goldwork and thank my lucky stars that I have had the fortune to learn solid techniques in this amazing type of surface embroidery.    Working Karahana was pure and simple bliss for me.  In that phase piece I learned many, many lessons that  could only be achieved through the time to work the repetition of technique.   This is the reason working phases is so instrumental in an embroiderer's journey.  Oh, do I look forward to all that lovely Goldwork in the Glove and Sake Boxes (ahem! I'll get back to Saki soon, I promise!).


I think that it will be a rare design that I create then stitch that will not include some Goldwork to it.  In the case of URU, I've chosen to follow the example of Hiogi fan and work the fan handle in gold.  My notes indicate that I used a #3 gold on Hiogi but to speed up the working of the area I chose #4.  Also, I chose to twist my own 1 into 2 couching thread in one of the darker medium pink tones to match the piece.  Most traditional goldwork is worked in orange, white, or gold.  Here, I break with tradition a bit to match the elements of my design.  I would have chosen gold thread if I had to stitch with traditional JE.


As with most of these pieces there are very good books and instructors out there I will not go too much into "how to".  My purpose is to simply share my stitching journey and some tips that may help you.  The following are several pictures that I thought you would enjoy of the stitched handle (hints at the bottom plus a wee surprise):


Helpful hints to remember: 
  • Keep your Koma as taunt as possible at all times.
  • Make sure your needle goes straight up and down.
  • You pay attention to where every other line in the metallic thread is and match your stitches accordingly.
  • Use a light box with a dimmer switch - well worth money, especially in poor light.
  • Make those corners very sharp, even in the inner rings of the round and round.
  • Take a deep breath and enjoy yourself, take a break if you get frustrated.  
  • Cover your stitched work where possible with paper (I use the really thin plastic so I can see my design) so the Koma doesn't roughen up your work.
  • Sinking the thread can sometimes be done much easier with a large eyed needle rather than a sinking needle.  
So, are you dying for that surprise I mention above?  Let me introduce Uguisu to you --


He's near completion with just the tail feathers left.  I can't believe how long this little guy has taken to stitch.  I've learned a lot from him and thank my dear wonderful Sansei for instruction on birds. He is un-named as of yet so please email me at ce@lilystitch.com if you have a suggestion.

Christa Evans
www.lilystitch.blogger.com
www.lilystitch.com